dyld 是 the dynamic link editor 的缩写,它是苹果的动态链接器。
iOS 远程推送
注册
iOS 10上
1 | UNUserNotificationCenter *center = [UNUserNotificationCenter currentNotificationCenter]; |
在iOS10中有一个NotificationCenter,App收到通知都会在NotificationCenter的Delegate中回调,具体下面有两个方法:
当App在前台的时候,当收到推送的时候,会回调到这个方法。
1 | - (void)userNotificationCenter:(UNUserNotificationCenter *)center willPresentNotification:(UNNotification *)notification withCompletionHandler:(void (^)(UNNotificationPresentationOptions))completionHandler |
在iOS10中最主要的是在前台的情况下,横幅可以展示出来!!!太好了!!!!设置下面的就可以了.
1 | completionHandler(UNNotificationPresentationOptionBadge| |
这个方法是点击通知会回调到这里:无论App在前台或者是后台,无论是本地通知还是远程通知都会回调到这里
1 | - (void)userNotificationCenter:(UNUserNotificationCenter *)center didReceiveNotificationResponse:(UNNotificationResponse *)response withCompletionHandler:(void (^)())completionHandler |
iOS 8〜9
1 | + (void)registerRemoteNotificationForIOS8{ |
这个方法可分为下面几种:
- 当App在前台,接收到通知时会调用这个方法
- 当App在后台,点击通知会调用这个方法
- 透传也会调到这里来,包含iOS10
1 | - (void)application:(UIApplication *)application didReceiveRemoteNotification:(NSDictionary *)userInfo fetchCompletionHandler:(void (^)(UIBackgroundFetchResult))completionHandler { |
上面说的都是关于普通的消息,下面关于透传的消息
1这个就是透传的回调方法,经实验在iOS10中会也回调到这里。而且还有一个,就是如果没实现这个方法,它会回调到上面iOS7以前的那个回调方法上
1 |
|
-(void)application:(UIApplication *)application didRegisterForRemoteNotificationsWithDeviceToken:(NSData *)deviceToken
iOS 推送全解析,你不可不知的所有 Tips! 把穿传消息和普通消息说得很明白
活久见的重构 - iOS 10 UserNotifications 框架解析 喵神把iOS10的推送说了一遍
ios 7的后台获取 和 静默推送(推送唤醒) 后台跟静默推送
常用的Attributes
昨天看了YYCache的源码,发现里面经常用到了__attribute__。attribute是GNU的一种编译指令在声明的时候指定某种特性,能做多样化的错误检查和高级优化。在iOS的系统库里面会经常用到,例如:NS_AVAILABLE_IOS(8_0)展开来就是__attribute__(availability(...))。
语法
一般以attribute后面加参数
1 | __attribute__(xx) |
下面记录一下常用的用法
1、deprecated
在编译时会报过时警告
1 | - (void)method1:( NSString *)string __attribute__((deprecated("使用#method2"))); |
2、unavailable
告诉编译器方法不可用,如果使用了就会编译失败,提示错误。比如自定义了初始化方法,为了防止别人调用init初始化,那么可以这样:
1 | - (instancetype)init NS_UNAVAILABLE; |
也可以像下面以不同的姿势
1 | @property (strong,nonatomic) id var1 NS_UNAVAILABLE; |
3、cleanup
它主要作用于变量,当变量的作用域结束时,会调用指定的函数。这个属性用得好,简直是爽得不要不要的。
先看一下,自定义的类型:
1 | - (void)createXcode{ |
当然Block也是变量,所以写一个block的来试试
1 | - (void)createBlock{ |
是不是觉得很有趣呢?更多深入可以看一下黑魔法attribute((cleanup))
4、availability
这个参数是指定变量(方法)的使用版本范围,这个很好用。
拿一下官方的作为例子,UITableViewCell里面找的
1 | NS_DEPRECATED_IOS(2_0, 3_0) |
上面定义的NS_DEPRECATED_IOS(2_0, 3_0)展开为attribute
1 | __attribute__((availability(ios,introduced=2_0,deprecated=3_0,message="" __VA_ARGS__))) |
availability属性是一个以逗号为分隔的参数列表,以平台的名称开始,包含一些放在附加信息里的一些里程碑式的声明。
- introduced:第一次出现的版本。
- deprecated:声明要废弃的版本,意味着用户要迁移为其他API
- obsoleted: 声明移除的版本,意味着完全移除,再也不能使用它
- unavailable:在这些平台都不可用
- message 一些关于废弃和移除的信息
- 属性支持的平台:iOS , macosx(我看了一下系统的宏,现在有swift关键字了)
Show you the Code
1 | - (void)method4 NS_DEPRECATED_IOS(2_0, 3_0,"不推荐该方法"); |
不懂的可以参考CFAvailability.h这个文件
5、overloadable
这个属性用在C的函数上实现像java一样方法重载。直接上主菜:
1 | __attribute__((overloadable)) void add(int num){ |
6、 objc_designated_initializer
这个属性是指定内部实现的初始化方法。
1 | - (instancetype)initNoDesignated ; |
上面的NS_DESIGNATED_INITIALIZER展开就是:__attribute__((objc_designated_initializer))
当一个类存在方法带有NS_DESIGNATED_INITIALIZER属性时,它的NS_DESIGNATED_INITIALIZER方法必须调用super的NS_DESIGNATED_INITIALIZER方法。它的其他方法(非NS_DESIGNATED_INITIALIZER)只能调用self的方法初始化。这句话得好好琢磨一下
7、objc_subclassing_restricted
这个顾名思义就是相当于java的final关键字了,意是说它不能有子类。用于类
1 | __attribute__((objc_subclassing_restricted)) //Final类 ,java的final关键字 |
如果有子类继承他的话,就会报错
8、objc_requires_super
这个也挺有意思的,意思是子类重写这个方法的时候,必须调用[super xxx]
1 | #define NS_REQUIRES_SUPER __attribute__((objc_requires_super)) |
暂时就说这么多,我认为比较常用的吧。还有很多可以参考下面的文档
hidesBottomBarWhenPushed进入下级页面时,底部Tabbar会有一闪的隐藏动画
众所周知,从TabBarViewController页进入下一级页面的时候,可以通用hideBottomBarWhenPushed这个方法来隐藏底部的TarBar。
但是这会有一个小问题,如果你下一级页面里面包含着一个View,它的底部约束是相对于BottomLayoutGuide,在进入下一级页面的时候会有闪一下,Tarbar才会消失。原因是因为BottomLayoutGuide这个问题,要么你的View高度等于ViewController.view的高度,要么就使用下面这个方法:
在你的下一级页面时加入
1 | self.tabBarController.tabBar.hidden=YES; |
详情可以看:iOS7 strange animation when using hidesBottomBarWhenPushed
网络层架构的认识
项目越来越大,发现原来项目的网络架构扩展性比较差,想来想去,还是去了解一下新的架构。而正好,有个项目要把整个API换新的,于是改!!!!
想必绝大部人都看过casatwy大神iOS应用架构谈 网络层设计方案这个文章。我也是参考了他的架构,同时也看了猿题库网络库的源码,总的来说,它们俩的思路差不多,但实现有些许差别。
集约型老架构
之前的架构采用的是集约型。
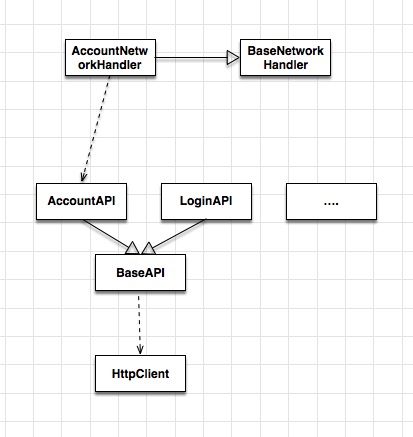
我们从下往上看
- 一个HttpClient,里面用AFNetwork封装POST和GET等方法,这一层主要是网络调用。
- 然后上一层的BaseAPI是依赖于HttpClient,它有个方法是负责调用API的,可以把Token参数放在这里添加后再调用API。每个业务API都必须继承于它,在业务API中,负责每个的API的网络请求地址和请求参数,调用BaseAPI的方法发出请求。
- 而在NetworkHandler里面主要是对数据的过虑与封装,例如:
1 | { |
像从BaseAPI返回的是这种类型的JSON数据, code=200为调用成功,否则失败。所以在BaseNetworkHandler里面可以统一处理失败的请求。其次,在各个业务的Handler里面,可以对调用成功的数据转化为Model。
像这种架构的话,有两个问题:
- 取消请求,麻烦!
- 缓存数据,麻烦!
- 想单独对某个请求进行AOP,麻烦!
命令型新架构
为了以后更好的扩展,决定改成命令型。
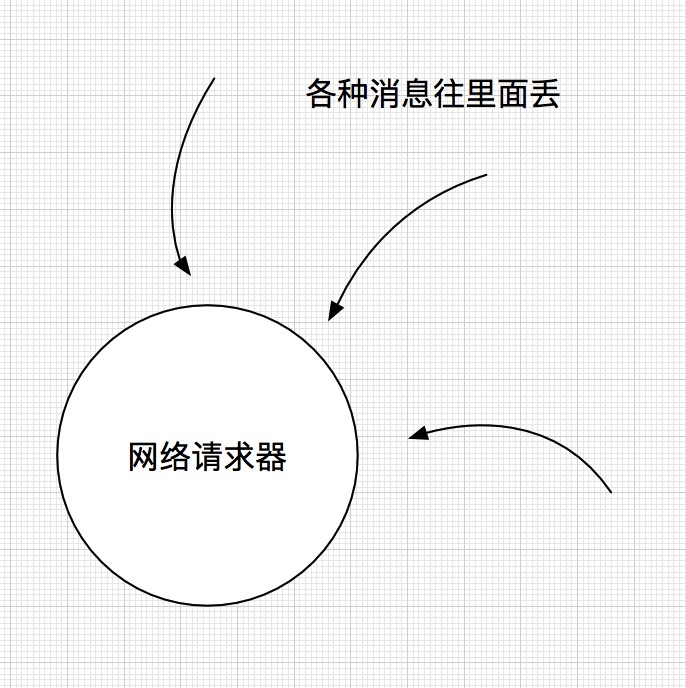
命令型:首先我会定义好一个网络请求代理器,里面可以用AFNetwork,也可以用原生的。它的工作是接收到各式各样的请求命令,根据命令里信息,然后放到进队列发起请求。
然后在外面就会定义各种请求命令,请求命令里面包含着请求参数、请求地址、请求方法、请求头等一些相关的信息。
当然我们可以弄个请求命令的基类:BaseManager。里面定义了各种需要实现的协议。(多说一句:真想把java的抽像类给搬过来)。在基类有startRequest这样的方法,它的作用就是把命令往网络请求代理器中丢。
下面分两个问题来讲讲写命令型
怎么写好一个网络请求代理器呢
- 向外面只需要暴露接收命令的接口以及取消的接口
- 在里面必须把发请求部分要封装好,便于以后替换第三方库
- 持有每个请求,且为每个请求生成ID,便于取消
这个是从casatwy的RTNetworking里面CTApiProxy.h类找来的一段代码。
1 | /** 这个函数存在的意义在于,如果将来要把AFNetworking换掉,只要修改这个函数的实现即可。 */ |
可以看到持有每个请求的ID并返回。便于取消。本身也持有了每个请求的ID
如何写一个消息命令呢?
话不多说,show you the code:
1 | #import <Foundation/Foundation.h> |
同样也是从大神的库里面拿出一份代码,很多东西我都删了,只留下主要的部分代码。
像CTAPIManager,所有的派子生都必实现它,为什么用协议而不用继承呢?因为协议是强迫你实现,而继承总会忘了实现一些方法(还是很想说你java的抽像方法)。里面有methodName(请求地址)、requestType(请求类型)、shouldCache(是否缓存)等等。
像CTAPIManagerApiCallBackDelegate的是就API的回调了,一般可以在在ViewController实现。
还有其他的一些东西,我觉得得去认认真真去看看源码就会懂了。
不过我有一点跟大神不一样。那就是参数上的问题,在我的网络请求层里面,我不使用回调的方式从ViewController获取参数,我直接在APIManager持有参数。一方面不需要让ViewController持有参数,保持少量的代码。另一方面,因为很多参数都从不同的地方获取,这样子直接赋给APIManager会更方便一些。
新的架构大概感悟就这么多了,当流水账了…~ ~